BACKGROUND
I'd
been toying with the idea of getting a guitar synthesiser for a few
years and finally decided to take the plunge to give myself something to
do whilst recuperating from an operation. I found a Roland GR33 at
a reasonable price on eBay but it didn't have the pickup with it. The
choice was then to look out for a GK2 or GK3 removable pickup and fit it
to one of my existing guitars or to buy a GT3 permanent installation kit
and have a go at fitting it.
I
decided that rather than fit a semi-permanent pickup I would go the
whole hog and dedicate a guitar for use with the synthesiser so started
looking around to see what might be suitable for a fairly simple
installation that didn't involve the use of a router. I've got one but
my skills using it are limited.
The
pickup and the 13 way cable were ordered from DV247.com and
arrived the next day. (I've bought a number of bits and pieces from them
and have been very pleased with the value for money and the speedy
delivery).
I
found a couple of pages on the web showing how the installation is done
professionally on a Strat and it looked a bit scary. I decided that I
would look around for a fairly cheap second hand guitar which I could
modify accordingly and if I did make any mistakes, slip with the drill
etc then nothing expensive would be lost.
I
settled on a basic guitar that didn't have a high gloss lacquer finish
(which would be very easy to damage), had a simple pickup layout, no
tremolo unit and a plain front ie. no scratchplate. Two guitars that
matched these criteria were the Epiphone Custom SG Special and the
Epiphone Les Paul Special. I had another look on eBay and found an
Epiphone Custom Shop SG. I'm not a guitar connoisseur but I've very
pleased with the guitar that I've ended up with. The action is not bad,
it is not too heavy, balances well, and sounds good.
THE ORIGINAL GUITAR
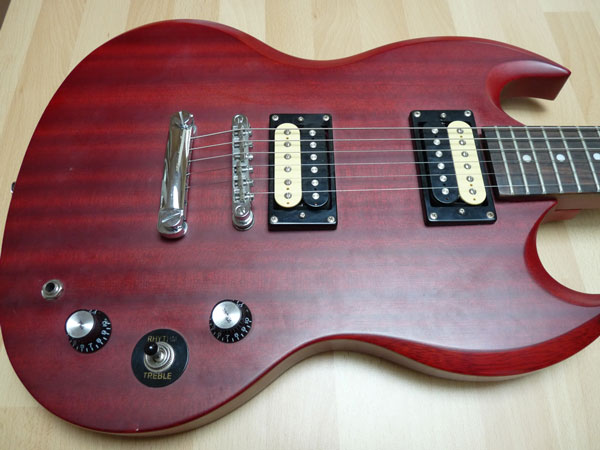 |
| Epiphone SG - before the modifications |
 |
| Epiphone SG - Original wiring |
THE MODIFICATIONS
I
started by removing the strings, the neck and all the hardware, having
first taken a picture of the original wiring. You'll need to be
confident using a soldering iron for this bit and the reconnection
later.
My
biggest concern, before I started, was how to get the cable from the
hex pickup into the controls cavity. From the picture below you will see
that the pickup cable has a pre-wired multiway connector fitted. I was
toying with the idea of removing the connector and then refitting once
the cable was in position. As luck would have it the hole that Epiphone
had drilled between the pickup cavity and the control cavity is just big
enough for the cable, with its connector, to pass through. That was a
major headache out of the way. I had to nibble a small indent at the
back of the pickup cavity so the hex lead could pass under the humbucker
surround but that was all.
 |
| Roland GT3 Kit |
The
contents of the Roland GK3 internal installation kit are shown above.
Most components are connected using pre-wired multiway connectors. The
only soldering that is required is an earth wire which connects to the
common terminals of the switches and the guitar output from the original
jack socket.
The
next big decision was the exact layout for each of the controls and the
placement of the 13 pin socket. The original guitar had one volume and
one tone control working across the pickups. I decided to dispense with
the tone control and use the redundant hole to take the synthesiser
volume control. I then marked out the remaining 3 switches and the LED
accordingly, using masking tape, and drilled the correct size holes. The
patch change buttons are both push fit, the toggle and LED are held in
place with nuts and washers.
Probably
the most daunting task was marking out and then cutting the hole for 13
pin socket. At this point one slip with the drill could do serious
damage so it's worth taking your time. I decided to "stitch" drill a
series of small holes around the edge of the hole and then join them up
to give me the large, rectangular hole finally required.
 |
| Marking out for the new 13 pin socket |
 |
| Socket hole drilled out |
I
used a file to finish off the hole but it doesn't need to be too tidy
as the socket mounting plate hides it. The mounting plate has plain
holes drilled in it which means that the fixing screws would stand proud
from the surface. I very carefully countersunk each of them and then
fitted the plate with the smallest crosshead screws that I could find.
 |
| New socket installed |
 |
| New control layout |
I
was now ready to mount the hex pickup which is supported by two wood
screws and springs. You adjust the pickup by screwing them in to the
right height. The Roland instructions show you what tolerance you need
between the pickup and the strings to get the optimum performance. There
a small grub screw in the middle of the pickup so that a degree of
curve can be introduced to match the guitar stringing.
The
final task is the internal wiring. There are a number of soldered
connections which need to be made first and then the motherboard can be
plugged in using the multi-way connectors. The circuit board is very
small and insulated by a plastic wraparound. Once plugged in it can be
turned over, laid into the cavity and the backplate fitted.
 |
| New wiring with multiway connections to PCB |
 |
| The pcb fits nicely on top of the controls |
It's
then time to see if you've managed to install it correctly. I'd had my
GR33 for 3 weeks before I modified the guitar and had been unable to try
it out so it was double anticipation. It was with a certain amount of
trepidation that I plugged in the guitar and switched on the synth. It
worked first time and I was playing a Hammond, from the guitar. Amazing!
THE FINAL RESULT
|
| Epiphone SG - Original |
 |
| Epiphone SG - Modified |
As
a finishing touch I added a couple of new speed knobs. I'm really
pleased with the final result as the guitar still retains it's classic,
uncluttered appearance.
If
I was a better guitarist I would also include a sound file but I
wouldn't inflict that on anyone. Suffice to say that the in-built Roland
sounds are pretty decent. Bearing in mind the GR33 unit is some 10
years old then the sounds can be described as "classic".
Using
a midi-to-USB cable the GR-33 can be plugged into a Mac and used to
drive software instruments. This opens up all sorts of possibilities.
I've been using it with Garageband to drive G-Force's M-Tron Pro
software which gives me all the classic Mellotron sounds from my guitar
fretboard. The only thing to watch out for here is latency, ie the time
it takes for the computer to process the incoming signal and send it to
the soft instrument. So far it's not been too bad but I wonder if rather
than using a cheap midi-to-USB cable a more expensive unit would give
better performance.
Some
guitar synthesiser users seem to suffer from tracking problems and
unwanted notes. I think if you start with the attitude that whilst this
is pretty amazing technology it isn't perfect then you will not be
disappointed. By setting the tracking parameter in the voices to match
the instrument being played ie. if you are playing a keyboard voice then
set the tracking to semitones to match the keys, then this will help
produce a realistic sound.
I hope this information has been useful. Any questions then please contact me.
No comments:
Post a Comment